"The Throne of Asgard"
Background.
A few years ago, I took a trip up to Spring Green, WI to pay my respects and visit Frank Lloyd Wright's studio, "Taliesin." After FLW was basically 'run out of Oak Park' by the high society-types, he moved his studio to WI where he took on students in a very concentrated design atmosphere. There were three tours and I signed up for all of them. Tour #1 and Tour #3 were much as you would expect of any tour, very bland and uninformative. I scored a lucky break when a returning graduate paid a visit and offered to give the longer Tour #2. "Anyone that's REALLY interested in architecture, stick close to me," he said. "The Wright Family is extremely particular about what is said by guides. The family doesn't want their 'bread & butter' to be spoiled by something like...the truth." Naturally, I jumped at the chance and was never farther than a few feet away from him. Perhaps one day when I just want to lay around and write books about my adventures I'll get around to it more, but for now; it's time to make art.
To put it lightly, FLW was an odd one. By today's standards, terms like 'control freak', 'Napoleon Complex', and other unfavorable psychological terms would be neatly wrapped up & named after Wright. When he was commissioned to design a house, the client had absolutely no say in the outcome. FLW had complete control. From the exteriors, to the carpets, to the windows, to the furniture; he designed everything. He would present drawings to the clients, but it was just to appease them that he was still working on the project.
His legacy around the art & architectural communities was his ability to push design. However amongst former owners of Wright Houses, it was, "Spend a million dollars on his house and spend another million attempting to rehab it. and bring it up to code" He was somewhat known to use shoddy building materials. This includes using plywood for furniture. From officially released photos, the furniture at Taliesin looks like it was created with fine mahogany; but a nice stain is cheaper than the proper wood. Photographs and touching the furniture is forbidden up there. "You can't sit in many of the common living area chairs," the guide said. "They will most likely collapse."
Well, if I've ever had a reputation for objects that I've constructed, it's that my stuff never falls apart. That includes temporary objects. It's taken longer to de-construct rooms and sets that I've built for haunted houses than it did to build. Thunderossa -1 Wright - 0.
Process.
The project called for "a piece of furniture made of recycled cardboard. It must be able to structurally hold a minimum of 50 lbs."
Ok. What do I actually need at Thunderlabs (my apartment)? Bookshelf? Nah. Table? Nah. Chair? N...yeah, ok that works. A chair it would be, but one that could support at least my weight or heavier. After researching the supporting educational materials about methodology, I realized it would take a lot more cardboard than what was possibly available at school. So, I would have to be clever in my design.
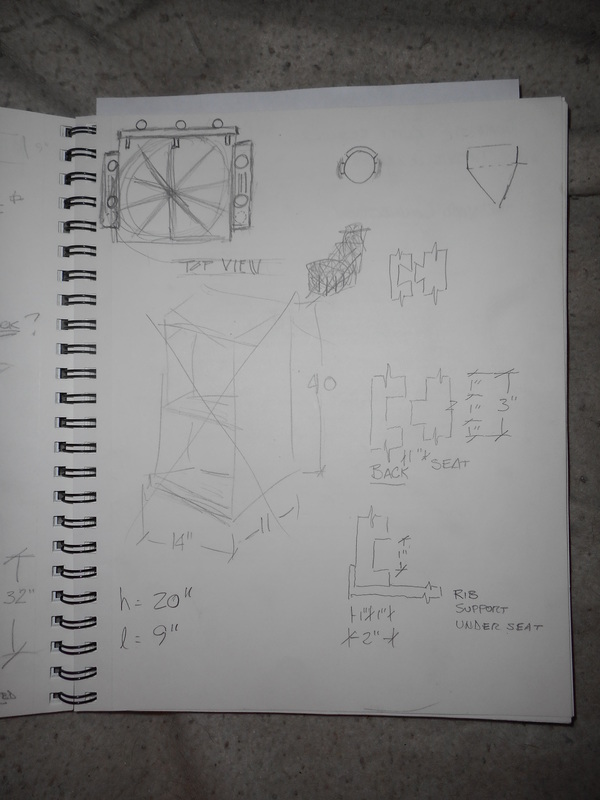
I considered that most single-ply corrugated cardboard can normally hold around 50 lbs. Laminating several pieces together will exponentially raise that value. To create a basic stool of 24" w x 20" h x 24" d would require 11,520 cu in of cardboard. A bit more than what would be available.
I needed to think of function and form. I naturally recalled that a pyramid is the most stable 3D object, however, I didn't want people sitting on a pyramid or even a half-pyramid, because if not structurally fortified would mean they'd soon be sitting IN said half-pyramid.
Two months ago was the last time I was in Biology lecture, but I recall my prof comparing the surface tension of a cell membrane to a water bug skitting across the the surface of a pond. Eureka! Thanks Dr Stoia...and yes, I'll be there for the exam tomorrow to maintain my 97%. even though I haven't been.
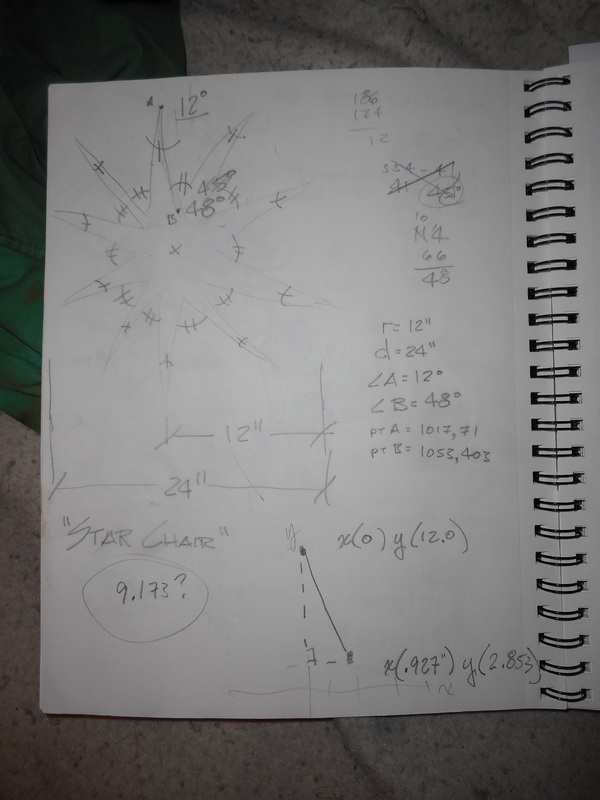
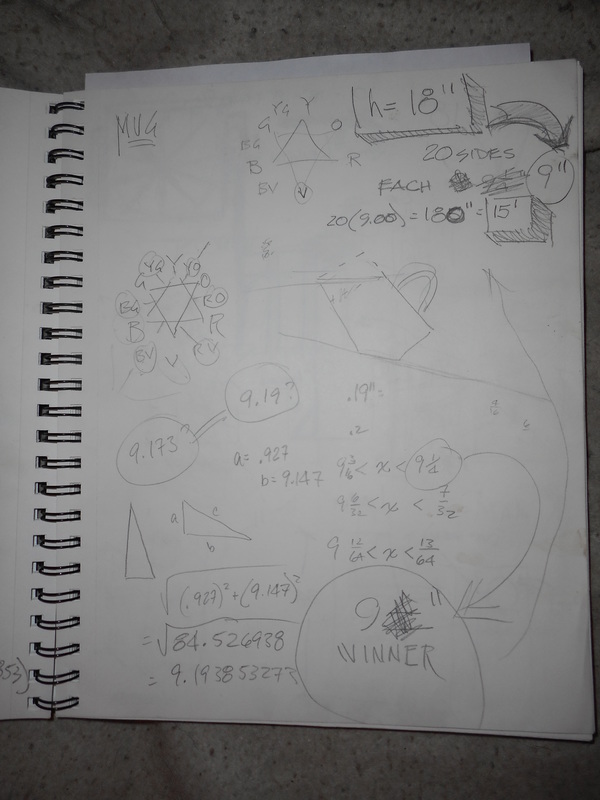
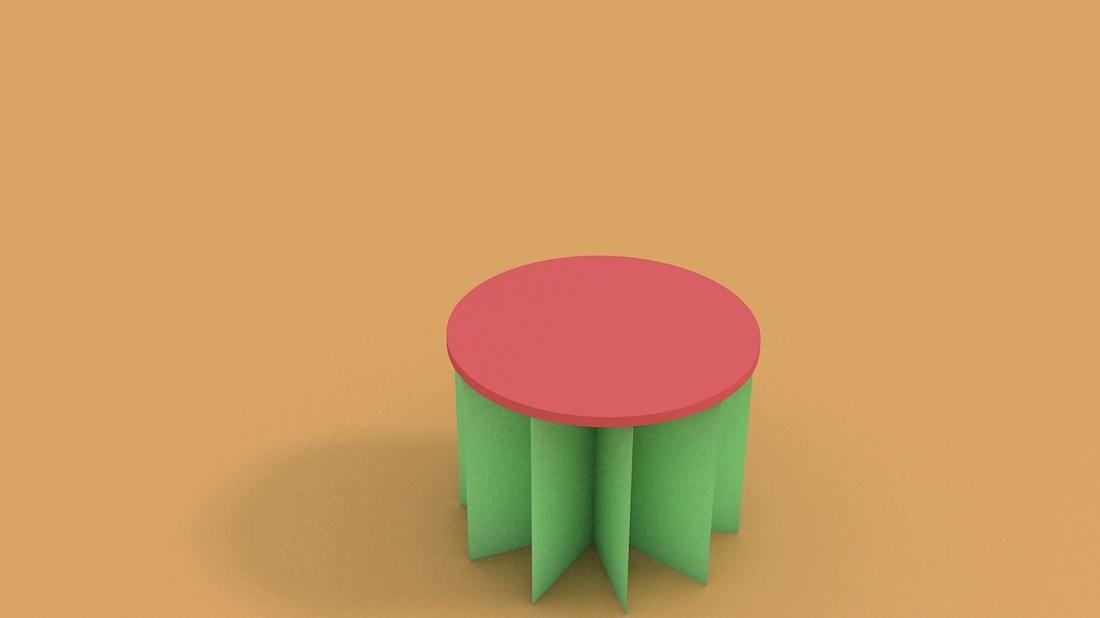
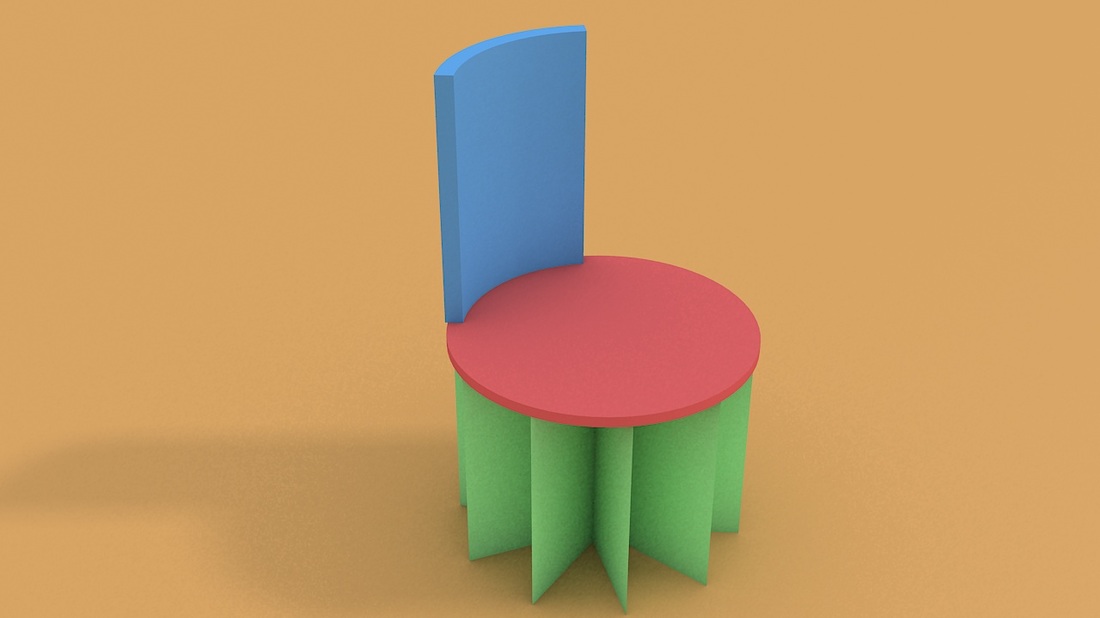
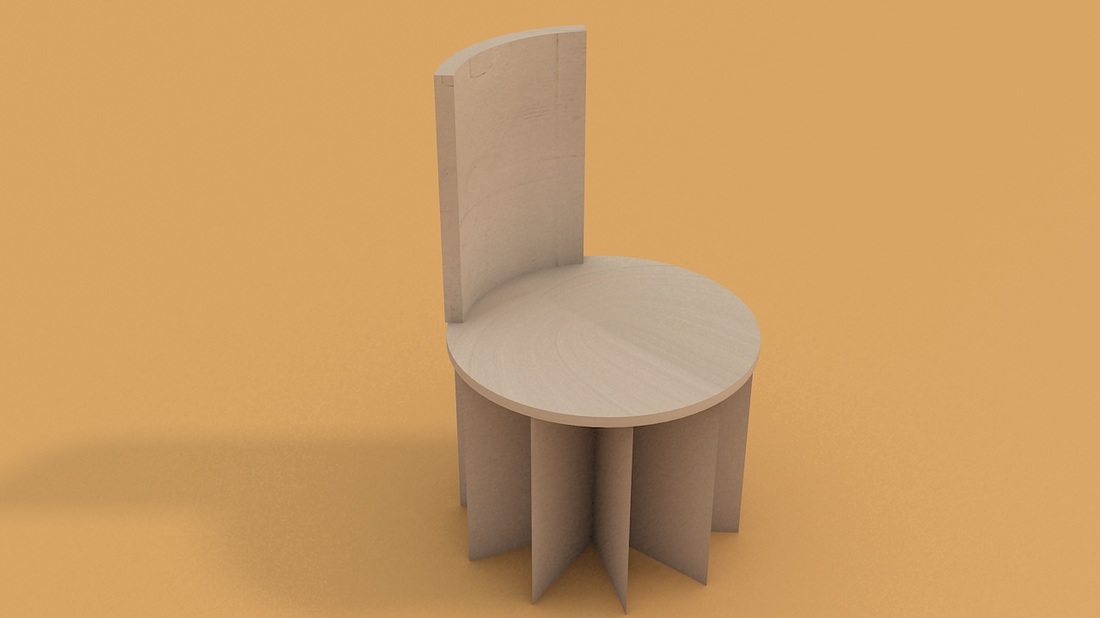
I needed to redistribute the weight away from the central point. After going through several ideas in my head, including the silly concept of creating a chair with flying buttresses, it dawned on me that a star shape would draw away that weight. I began experimenting in my fav 3D program with star shapes. A basic 5-point star left too much gap in the center, however, as I increased the angles to tightened it up, I realized that it created a dense region of cardboard in the center. After looking at 6 & 8 point stars, I increased the number to 10...for no other reason than making the math so much easier. It was still time to get out the calculator.
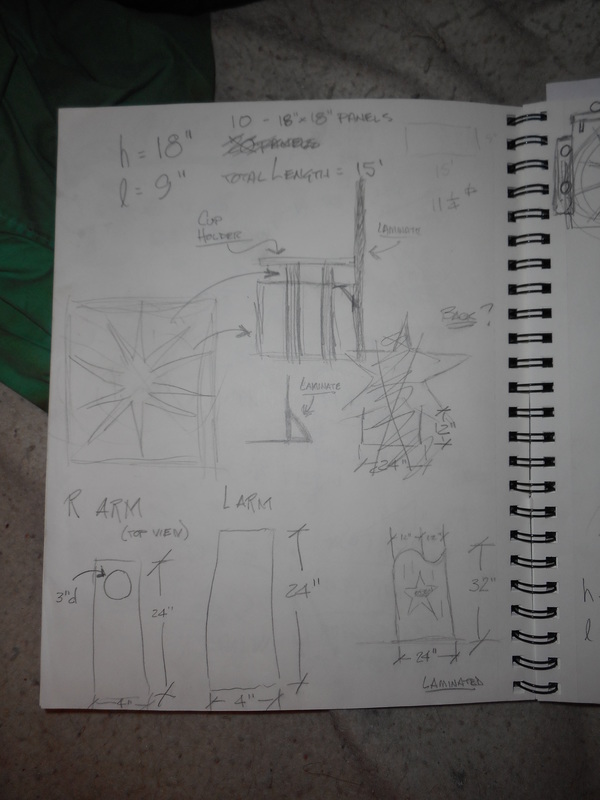
I ran through several concepts of the seat portion, the back, and arms (including cup holder). The seat was initially square, but I thought it would detract from the star shape. The back and arms might come later as time and materials allowed.
To create a star shape within the dimensions from above, would require 15 linear feet or 300 sq ft just for the base. A 4-ply laminated seat with a d=24" would require 16 sq ft and a 4-ply laminated back of 20x 24, an additional 160 sq ft for a whopping 456 sq ft. In perspective, the wing area (top) of an F6F-3 Grumman Hellcat WWII Navy fighter plane is 334 sq ft. [Don't ask, I just know these things.] That's a LOT of cardboard and it's not even a solid structure!
MATERIALS:
1 - Utility Knife with blade.
1 - Flexible metal rule/straight-edge.
1 - Glue gun with a lot of glue sticks.
1 - Roll of duct tape.
1 - Fuckload of cardboard (described in scientific notation, naturally)
THE WORK:
"The hardest part was inventing the Candy-Gram!" - Cleavon Little as Sheriff Bart in Blazing Saddles.
I had my measurements so it was just a process of building, which I honestly didn't give much thought to. I just fall into the zone and a little later it's done. I spent more focus time explaining the basics of structural design and how best to apply the direction of the corrugation to classmates than I did on construction. Time was also spent swearing at unknown people that had used a large piece of cardboard to cut out a small piece...from the center. I was almost back in foreman mode, but the fullest extent of that usually required people to duck & dodge airborne projectiles of various shapes, sizes, and manufacturers. I took it extremely easy on my classmates as they weren't the guilty ones, but I couldn't help but notice that they would think about the piece of cardboard they took from the supply and only cut from the edges.
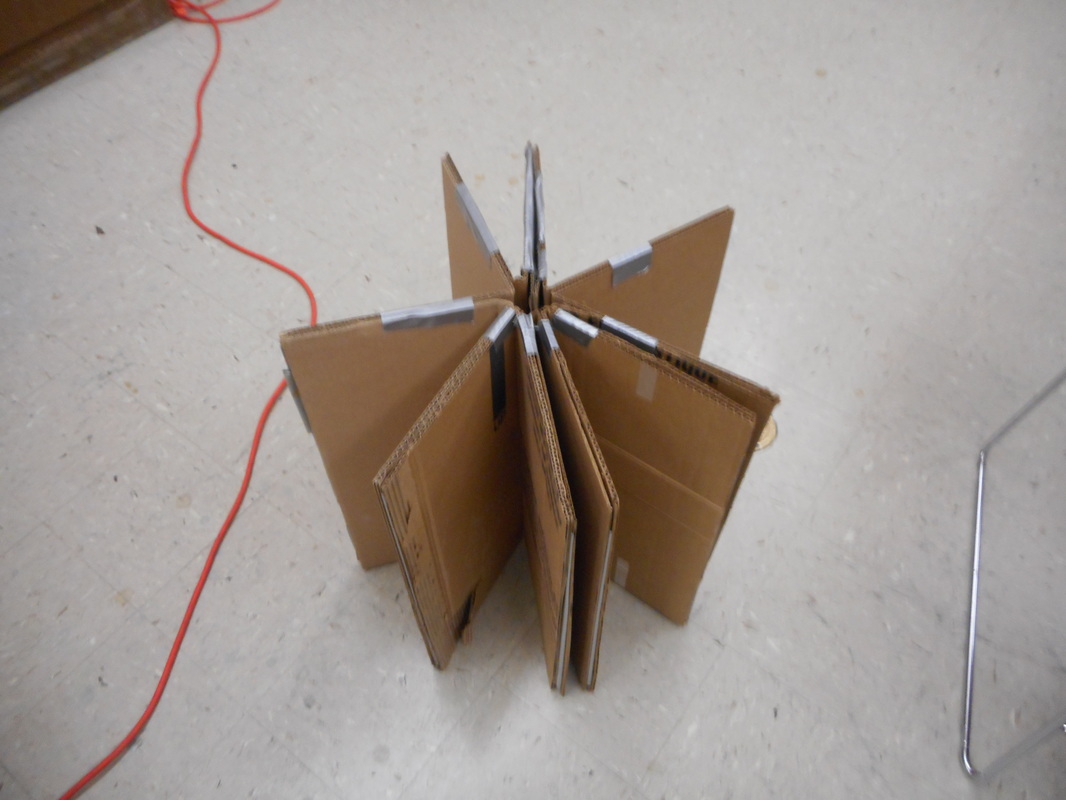
Given that there wasn't one solid piece of cardboard, I cut up various scraps into multiple pieces that I would suture together somehow. Initially, I had used duct tape to bind the inner pieces of the star. "If duct tape can withstand 200mph at Daytona," I thought. When assembled, I placed a single piece of cardboard on top and tried it out. It held my weight as expected, however, it resembled less a Sprint Cup car running at Talledega Speedway in Alabama and more like living room furniture from that area. Time to glue.
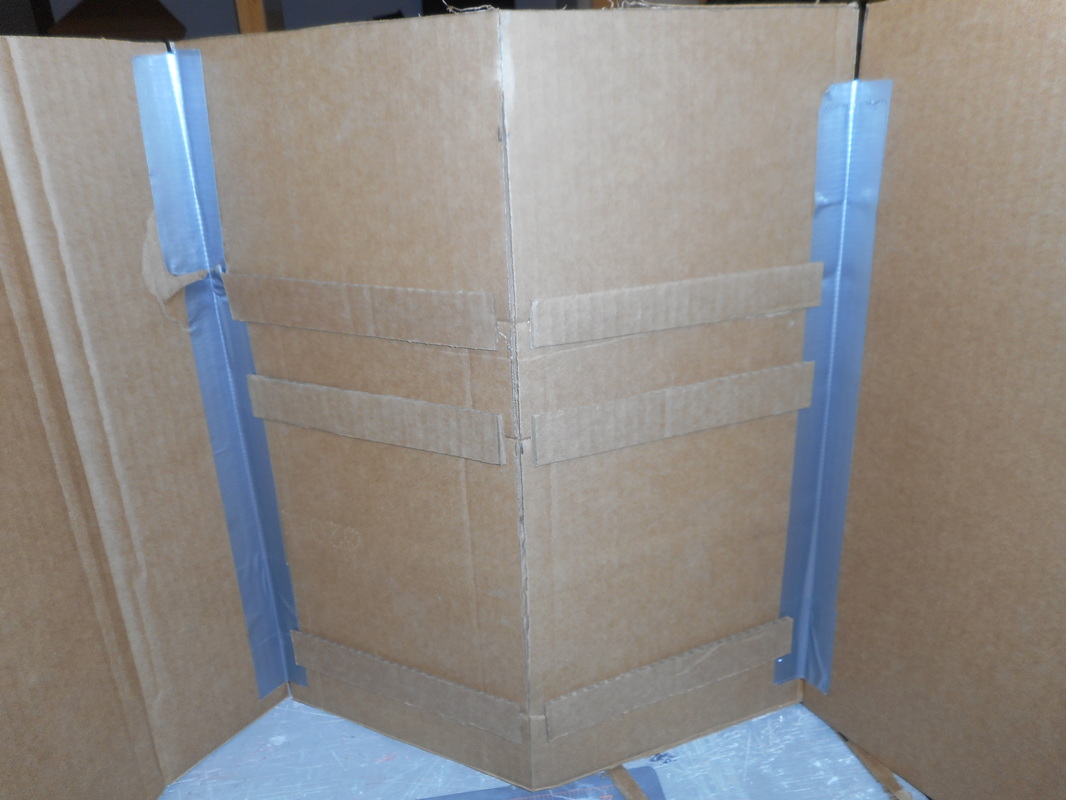
Some pieces needed to be reinforced as not all of them were perfect, after all, it was recycled material. There were some cuts and abrasions that might have spoiled the integrity, so they were duct-taped from the inside. Duct tape on the bottom was to protect the legs from future wear.
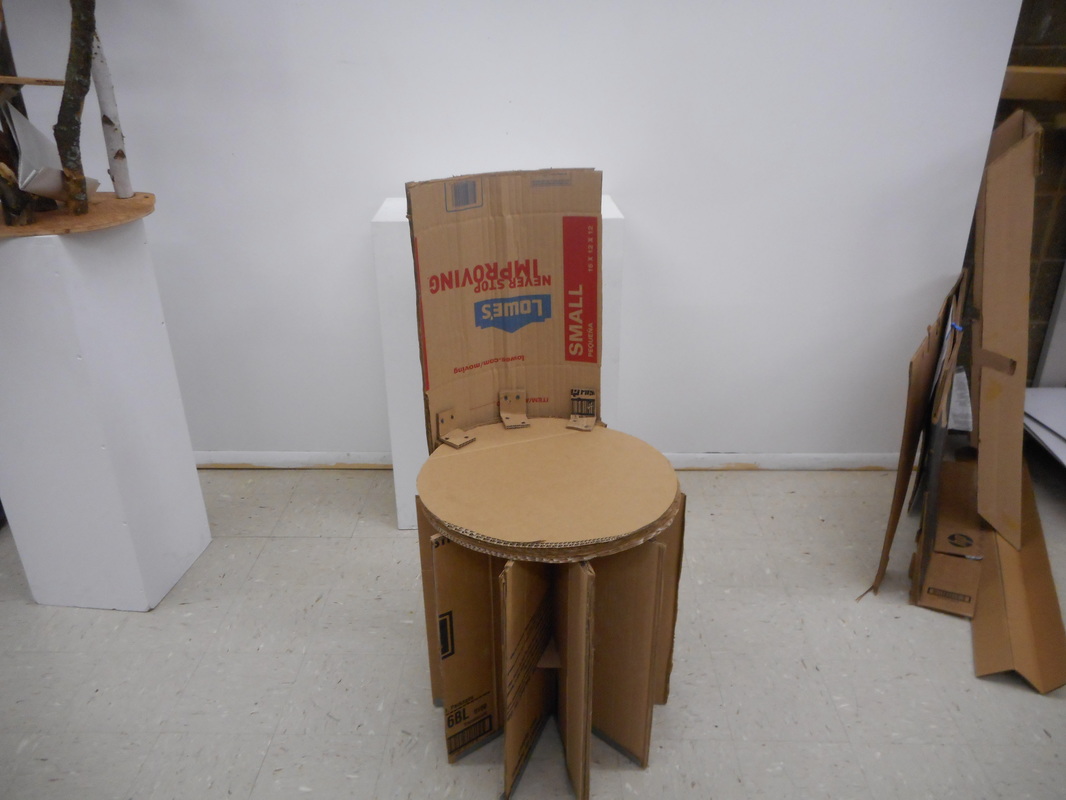
After the legs & seat were assembled, I re-tested it's stability. It worked, but the legs were a bit wobbly. I fixed this issue by putting in some spacers and shims to preserve the intended angles.
The biggest disappointment was that the seat area wasn't large enough to accommodate arms for the chair. I began considering how I might still accomplish this task with cantilevers (and again with the flying buttresses), but opted to forgo the concept and finish with the back.
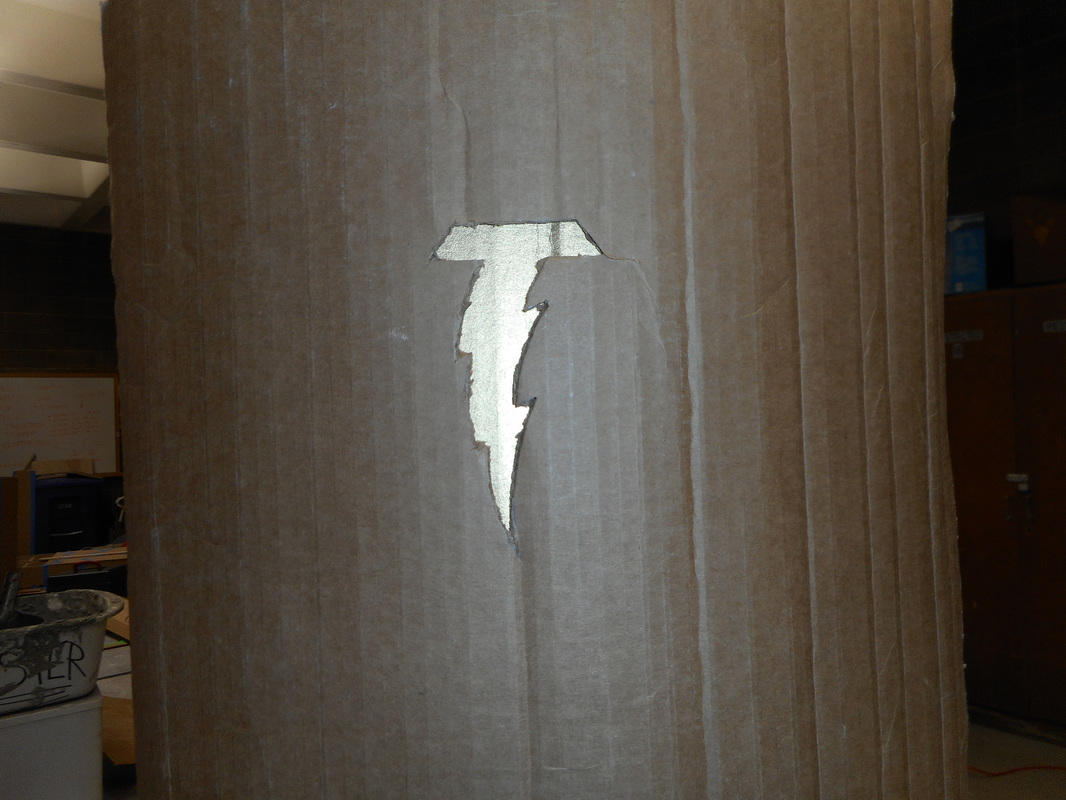
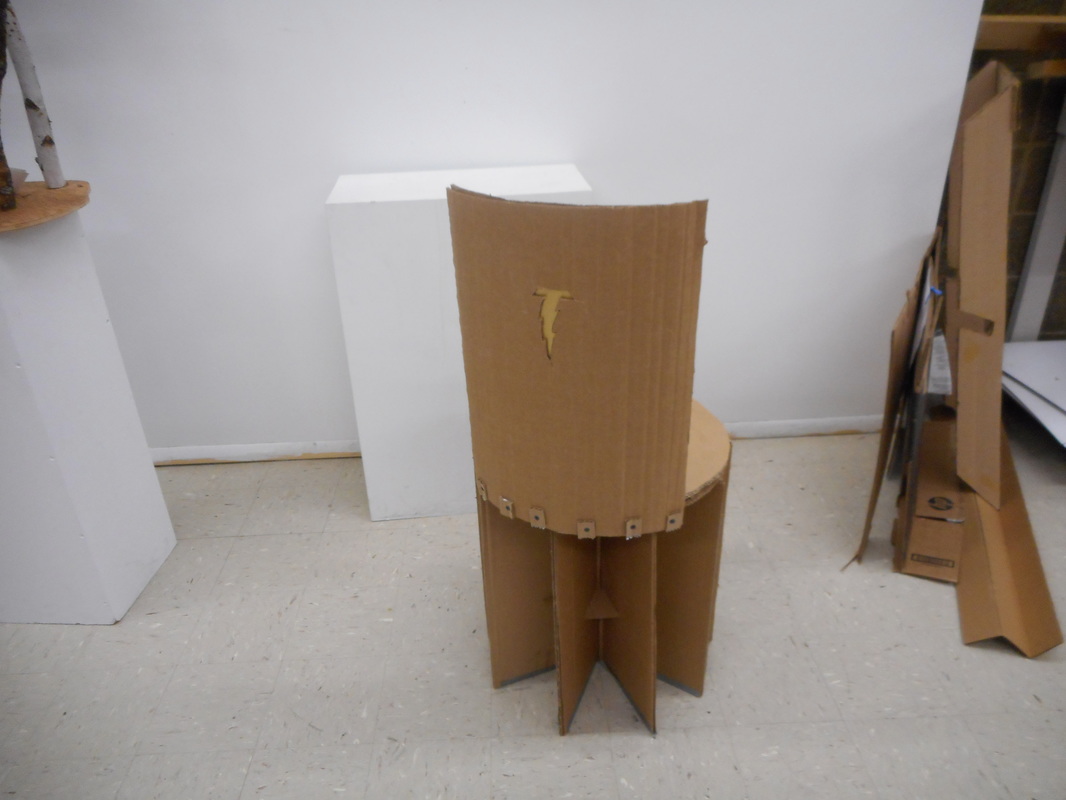
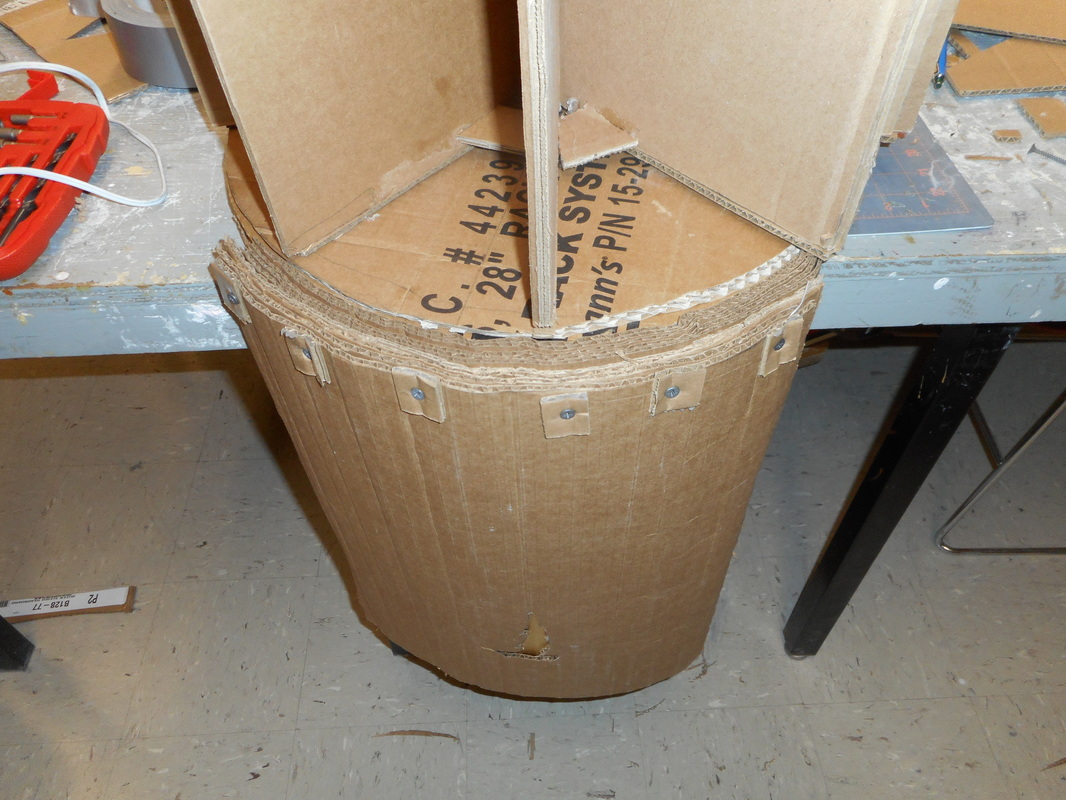
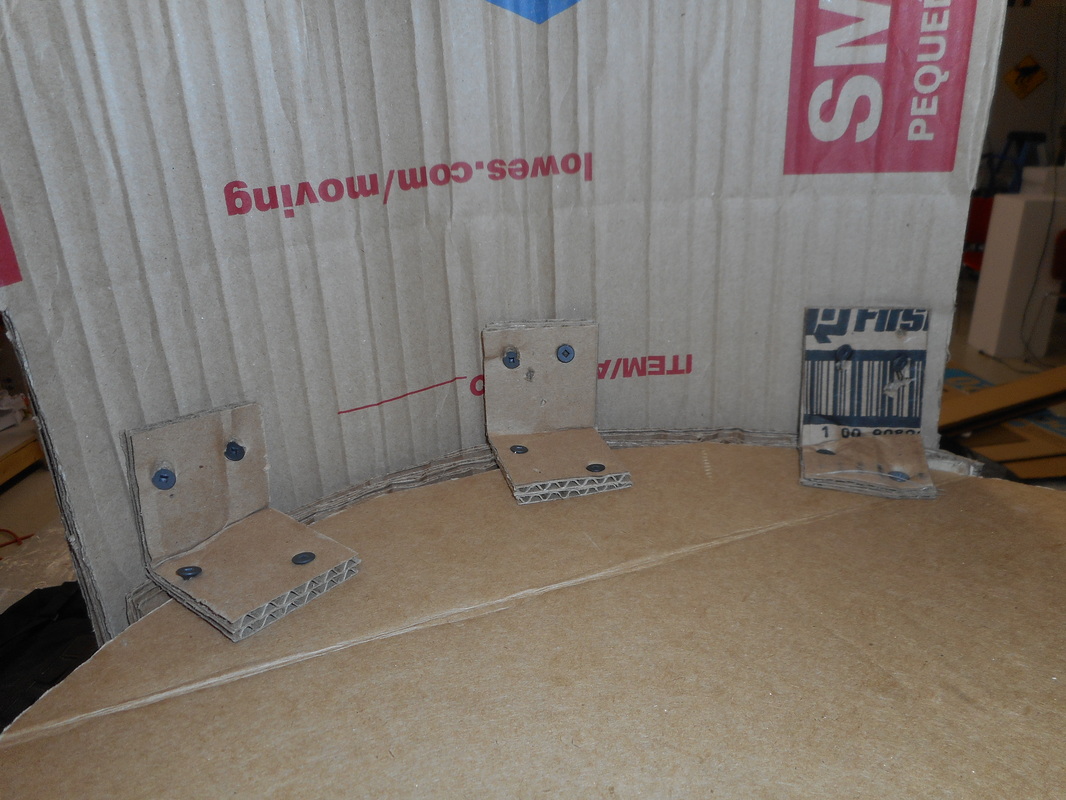
I cut the necessary pieces for a laminated back and even took a little time to cutout my logo and add a little gold spray paint for color. I rolled the pieces up before attaching so that they matched the round seat. That was simple, but how was I going to attach it? Simple hot glue wasn't going to support any weight. I opted to add an additional curved laminate piece to the rear of the seat and attach the back to the new piece using wood screws and small 1" x 1" pieces of cardboard as force distribution modifiers (washers). I also added some inner L-brackets, but it still wouldn't hold to my harsh specifications. The available screws were a little long, so I had to "toe-nail' them in (screw them in at an angle rather than straight on). As there wasn't a deep enough supply of large pieces to buttress up the back, I called it done at 5am (local time).
Ok. What do I actually need at Thunderlabs (my apartment)? Bookshelf? Nah. Table? Nah. Chair? N...yeah, ok that works. A chair it would be, but one that could support at least my weight or heavier. After researching the supporting educational materials about methodology, I realized it would take a lot more cardboard than what was possibly available at school. So, I would have to be clever in my design.
I considered that most single-ply corrugated cardboard can normally hold around 50 lbs. Laminating several pieces together will exponentially raise that value. To create a basic stool of 24" w x 20" h x 24" d would require 11,520 cu in of cardboard. A bit more than what would be available.
I needed to think of function and form. I naturally recalled that a pyramid is the most stable 3D object, however, I didn't want people sitting on a pyramid or even a half-pyramid, because if not structurally fortified would mean they'd soon be sitting IN said half-pyramid.
Two months ago was the last time I was in Biology lecture, but I recall my prof comparing the surface tension of a cell membrane to a water bug skitting across the the surface of a pond. Eureka! Thanks Dr Stoia...and yes, I'll be there for the exam tomorrow to maintain my 97%. even though I haven't been.
I needed to redistribute the weight away from the central point. After going through several ideas in my head, including the silly concept of creating a chair with flying buttresses, it dawned on me that a star shape would draw away that weight. I began experimenting in my fav 3D program with star shapes. A basic 5-point star left too much gap in the center, however, as I increased the angles to tightened it up, I realized that it created a dense region of cardboard in the center. After looking at 6 & 8 point stars, I increased the number to 10...for no other reason than making the math so much easier. It was still time to get out the calculator.
I ran through several concepts of the seat portion, the back, and arms (including cup holder). The seat was initially square, but I thought it would detract from the star shape. The back and arms might come later as time and materials allowed.
To create a star shape within the dimensions from above, would require 15 linear feet or 300 sq ft just for the base. A 4-ply laminated seat with a d=24" would require 16 sq ft and a 4-ply laminated back of 20x 24, an additional 160 sq ft for a whopping 456 sq ft. In perspective, the wing area (top) of an F6F-3 Grumman Hellcat WWII Navy fighter plane is 334 sq ft. [Don't ask, I just know these things.] That's a LOT of cardboard and it's not even a solid structure!
MATERIALS:
1 - Utility Knife with blade.
1 - Flexible metal rule/straight-edge.
1 - Glue gun with a lot of glue sticks.
1 - Roll of duct tape.
1 - Fuckload of cardboard (described in scientific notation, naturally)
THE WORK:
"The hardest part was inventing the Candy-Gram!" - Cleavon Little as Sheriff Bart in Blazing Saddles.
I had my measurements so it was just a process of building, which I honestly didn't give much thought to. I just fall into the zone and a little later it's done. I spent more focus time explaining the basics of structural design and how best to apply the direction of the corrugation to classmates than I did on construction. Time was also spent swearing at unknown people that had used a large piece of cardboard to cut out a small piece...from the center. I was almost back in foreman mode, but the fullest extent of that usually required people to duck & dodge airborne projectiles of various shapes, sizes, and manufacturers. I took it extremely easy on my classmates as they weren't the guilty ones, but I couldn't help but notice that they would think about the piece of cardboard they took from the supply and only cut from the edges.
Given that there wasn't one solid piece of cardboard, I cut up various scraps into multiple pieces that I would suture together somehow. Initially, I had used duct tape to bind the inner pieces of the star. "If duct tape can withstand 200mph at Daytona," I thought. When assembled, I placed a single piece of cardboard on top and tried it out. It held my weight as expected, however, it resembled less a Sprint Cup car running at Talledega Speedway in Alabama and more like living room furniture from that area. Time to glue.
Some pieces needed to be reinforced as not all of them were perfect, after all, it was recycled material. There were some cuts and abrasions that might have spoiled the integrity, so they were duct-taped from the inside. Duct tape on the bottom was to protect the legs from future wear.
After the legs & seat were assembled, I re-tested it's stability. It worked, but the legs were a bit wobbly. I fixed this issue by putting in some spacers and shims to preserve the intended angles.
The biggest disappointment was that the seat area wasn't large enough to accommodate arms for the chair. I began considering how I might still accomplish this task with cantilevers (and again with the flying buttresses), but opted to forgo the concept and finish with the back.
I cut the necessary pieces for a laminated back and even took a little time to cutout my logo and add a little gold spray paint for color. I rolled the pieces up before attaching so that they matched the round seat. That was simple, but how was I going to attach it? Simple hot glue wasn't going to support any weight. I opted to add an additional curved laminate piece to the rear of the seat and attach the back to the new piece using wood screws and small 1" x 1" pieces of cardboard as force distribution modifiers (washers). I also added some inner L-brackets, but it still wouldn't hold to my harsh specifications. The available screws were a little long, so I had to "toe-nail' them in (screw them in at an angle rather than straight on). As there wasn't a deep enough supply of large pieces to buttress up the back, I called it done at 5am (local time).


Reflections.
By no means a difficult project, just time consuming to get it to the specifications that I wanted. I can't say that I'll ever intentionally work in this medium again, however, it was great training for my classmates to learn about the old adage, "measure twice and cut once."
Goal 1: Build a chair out of cardboard. 100% Accomplished.
Goal 2: Have it support a minimum of 50 lbs. It holds a minimum of 170 lbs. 322% Accomplished. Take THAT Wright!
Goal 3: Come up with an interesting design. In my opinion, 100% Accomplished.
Goal 1: Build a chair out of cardboard. 100% Accomplished.
Goal 2: Have it support a minimum of 50 lbs. It holds a minimum of 170 lbs. 322% Accomplished. Take THAT Wright!
Goal 3: Come up with an interesting design. In my opinion, 100% Accomplished.
...up next:
The Grand Finale. "Come Sail Away".
